Sometimes you just need a change. Tim Ludwig began to feel that his work needed a change about ten years ago, so he took a workshop with Bede Clark. After seeing Bede work with colored slips and colored stains, he found the direction he wanted to take. He's been perfecting his technique ever since.
In today's post, Tim explains how he creates his lovely botanical paintings on his pottery. He also shares the recipes for his slip and earthenware clay body. - Jennifer Poellot Harnetty
About 10 years ago, I started to feel that it was time to change my work, and that I wanted more control over the surface. This came after nearly 30 years of making work, and for a time finishing it in salt, wood, primitive, and saggar firings. So, I
enrolled in a summer class at Arrowmont School of Crafts in Gatlinburg, Tennessee. The instructor, Bede Clarke, was using slips with stains to create a surface that was astonishing. My life, and my work was about to change. Using what I learned about creating these surfaces, I started integrating them with the loose vessel forms I had developed over many years, forms influenced
by the 1960s abstract expressionist, Pete Voulkos, and everyone else who thought it was okay to make crooked pots.
Choosing
the images for the surface became the focus for about a year. I moved from animals, to figurative subjects, and then to plants. I settled on botanical illustrations from the 1700-1800s, from my admiration of those artists who set forth throughout the
world seeking flowers to paint and illustrate and to sneak in a little artistic license. The beauty of this process is that I did not have to change the way I was making pots. I decided on an earthenware body that I have used for fifteen plus years. The
slip recipe was from Bede and has proved to be very compatible with my clay, stains, and firing. If you decide on a different firing temperature or clay color, there are clay and slip formulas that work just as well; use what you're comfortable with,
or have already tested. If you're starting from the beginning and looking for compatible recipes or commercial products, remember to test, test, and test some more before you leap in and start working on finished pieces.
I learned very quickly to take good notes, measure, weigh, and test when it comes to creating the colored slips I use. The painting process can take many hours of hard work, so don't leave it to guessing. I mix 1000 gram batches of the base slip (see
recipe) to a consistency of mayonnaise, which provides a good starting thickness to cover the surface of the piece and to begin mixing with the stains to produce a color palette. Test your colors before committing to using them on a piece.
Priming the Surface for Colored Slips
Generally I throw four to five pieces at a time. When the pieces are a little shy of leather hard, I brush two coats of the base slip across the surface, leaving the red clay slightly exposed in small areas for
aesthetic purposes. Then, when the slip has dried, these pieces are covered with plastic and put away in a storage cabinet or damp box to be worked on individually at an appropriate time.
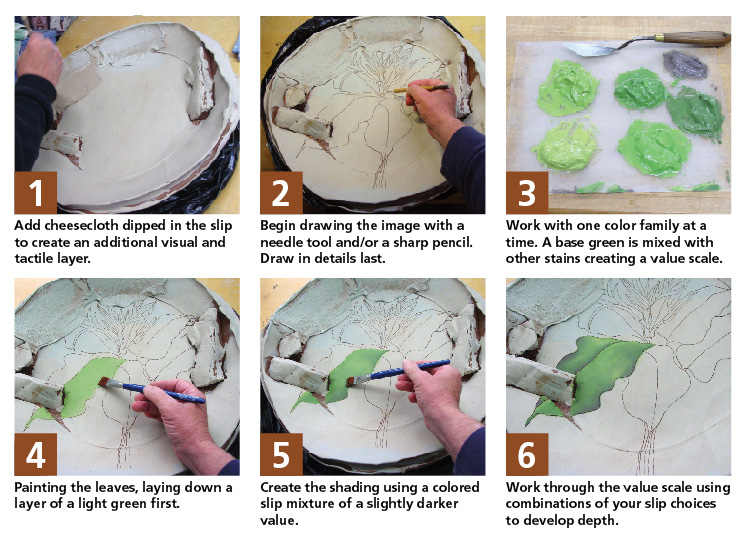
On the surface of some of the pieces, I add cheesecloth dipped in the slip to create an additional visual and tactile layer. The cheesecloth burns out in the bisque and leaves behind a raised impression (figure 1).
Painting the Image with Colored Slips
Before I start mapping out the image, I add colored slip to the certain areas (see the yellow areas of the background in figure 2). Once the slip has lost its sheen, I draw the image into the soft, leather-hard
surface with a needle tool and/or a sharp pencil (figure 2).
When I'm ready to start painting, I measure out the base color, in this case green, on a piece of clean Plexiglas and create a value scale by mixing in additional stains using a palette knife (figure 3). I begin painting the image, usually the leaves
first, and refine any of the drawing at this time. I use the drawn lines as a guide as I paint (figure 4). The lines define the edges and veins of the leaves and petals, and mark where the shading and highlights of the image shift or change. Blending
of the slip can be achieved with a good brush; I use Kolinsky sable, and have found that a smooth transition across the given value scale is accomplished with patience (figure 5). Start with a light to medium shade, and then add highlights and shadows.
Here you can see one of the completed leaves with the shadows and dimension added using the different shades (figure 6). As I paint, I will stop occasionally and clean out the incised lines with a thin fettling knife (figure 7). I've found that the
needle tool does not work well as it leaves small clay grubbies or crumbs on the surface.
Similar to how a plant grows, after I finish with the leaves and any other darker tones, I continue on to the flower of the plant, measuring out the base color onto the Plexiglas palette and creating a value scale again (figure 8), then painting the image
in the same way (figure 9). Unlike painting with glazes, the finished, unfired slip image will be close to the colors of the final, fired piece, especially if you use commercial stains as colorants (figure 10). These stains have been fired as part
of the manufacturing process, and so the color you see is close to the final color that will be produced, depending on the surface you paint onto, the firing temperature, and whether or not you choose to glaze the piece. Check with the manufacturer
to see what temperature individual stains can be fired to before the color starts to burn out.
After I've finished creating and cleaning up the image, the platter is fired to cone 04 for the bisque. After firing, I mix a clear, satin, commercial glaze in a 50/50 ratio with water and spray a very thin coat onto the bisque ware. The piece is refired
to cone 06. This final firing allows the color to brighten and intensify in comparison to the bisque stage.
Tips
for Branching Out with Colored Slips
Take time to refine your technique and find subject matter that engages you. Using slips to paint images on clay has been around a long time; if the process interests you, look around to find examples to be
inspired by.
Matching the image with the form is extremely important. You can't compensate for a bad form via surface decoration or firing. The image and form should respond to one another; do not just make an object to paint. I have become much more comfortable with
my decision to create the work shown here. It's hard and takes a lot of time to complete a piece, so be prepared if you plan to adopt a similar method.
Search the Daily
Published Dec 30, 2019
Sometimes you just need a change. Tim Ludwig began to feel that his work needed a change about ten years ago, so he took a workshop with Bede Clark. After seeing Bede work with colored slips and colored stains, he found the direction he wanted to take. He's been perfecting his technique ever since.
In today's post, Tim explains how he creates his lovely botanical paintings on his pottery. He also shares the recipes for his slip and earthenware clay body. - Jennifer Poellot Harnetty
About 10 years ago, I started to feel that it was time to change my work, and that I wanted more control over the surface. This came after nearly 30 years of making work, and for a time finishing it in salt, wood, primitive, and saggar firings. So, I enrolled in a summer class at Arrowmont School of Crafts in Gatlinburg, Tennessee. The instructor, Bede Clarke, was using slips with stains to create a surface that was astonishing. My life, and my work was about to change. Using what I learned about creating these surfaces, I started integrating them with the loose vessel forms I had developed over many years, forms influenced by the 1960s abstract expressionist, Pete Voulkos, and everyone else who thought it was okay to make crooked pots.
Choosing the images for the surface became the focus for about a year. I moved from animals, to figurative subjects, and then to plants. I settled on botanical illustrations from the 1700-1800s, from my admiration of those artists who set forth throughout the world seeking flowers to paint and illustrate and to sneak in a little artistic license. The beauty of this process is that I did not have to change the way I was making pots. I decided on an earthenware body that I have used for fifteen plus years. The slip recipe was from Bede and has proved to be very compatible with my clay, stains, and firing. If you decide on a different firing temperature or clay color, there are clay and slip formulas that work just as well; use what you're comfortable with, or have already tested. If you're starting from the beginning and looking for compatible recipes or commercial products, remember to test, test, and test some more before you leap in and start working on finished pieces.I learned very quickly to take good notes, measure, weigh, and test when it comes to creating the colored slips I use. The painting process can take many hours of hard work, so don't leave it to guessing. I mix 1000 gram batches of the base slip (see recipe) to a consistency of mayonnaise, which provides a good starting thickness to cover the surface of the piece and to begin mixing with the stains to produce a color palette. Test your colors before committing to using them on a piece.
Priming the Surface for Colored Slips
Generally I throw four to five pieces at a time. When the pieces are a little shy of leather hard, I brush two coats of the base slip across the surface, leaving the red clay slightly exposed in small areas for aesthetic purposes. Then, when the slip has dried, these pieces are covered with plastic and put away in a storage cabinet or damp box to be worked on individually at an appropriate time.On the surface of some of the pieces, I add cheesecloth dipped in the slip to create an additional visual and tactile layer. The cheesecloth burns out in the bisque and leaves behind a raised impression (figure 1).
Painting the Image with Colored Slips
Before I start mapping out the image, I add colored slip to the certain areas (see the yellow areas of the background in figure 2). Once the slip has lost its sheen, I draw the image into the soft, leather-hard surface with a needle tool and/or a sharp pencil (figure 2).When I'm ready to start painting, I measure out the base color, in this case green, on a piece of clean Plexiglas and create a value scale by mixing in additional stains using a palette knife (figure 3). I begin painting the image, usually the leaves first, and refine any of the drawing at this time. I use the drawn lines as a guide as I paint (figure 4). The lines define the edges and veins of the leaves and petals, and mark where the shading and highlights of the image shift or change. Blending of the slip can be achieved with a good brush; I use Kolinsky sable, and have found that a smooth transition across the given value scale is accomplished with patience (figure 5). Start with a light to medium shade, and then add highlights and shadows. Here you can see one of the completed leaves with the shadows and dimension added using the different shades (figure 6). As I paint, I will stop occasionally and clean out the incised lines with a thin fettling knife (figure 7). I've found that the needle tool does not work well as it leaves small clay grubbies or crumbs on the surface.
Similar to how a plant grows, after I finish with the leaves and any other darker tones, I continue on to the flower of the plant, measuring out the base color onto the Plexiglas palette and creating a value scale again (figure 8), then painting the image in the same way (figure 9). Unlike painting with glazes, the finished, unfired slip image will be close to the colors of the final, fired piece, especially if you use commercial stains as colorants (figure 10). These stains have been fired as part of the manufacturing process, and so the color you see is close to the final color that will be produced, depending on the surface you paint onto, the firing temperature, and whether or not you choose to glaze the piece. Check with the manufacturer to see what temperature individual stains can be fired to before the color starts to burn out.
After I've finished creating and cleaning up the image, the platter is fired to cone 04 for the bisque. After firing, I mix a clear, satin, commercial glaze in a 50/50 ratio with water and spray a very thin coat onto the bisque ware. The piece is refired to cone 06. This final firing allows the color to brighten and intensify in comparison to the bisque stage.
Tips for Branching Out with Colored Slips
Take time to refine your technique and find subject matter that engages you. Using slips to paint images on clay has been around a long time; if the process interests you, look around to find examples to be inspired by.
Matching the image with the form is extremely important. You can't compensate for a bad form via surface decoration or firing. The image and form should respond to one another; do not just make an object to paint. I have become much more comfortable with my decision to create the work shown here. It's hard and takes a lot of time to complete a piece, so be prepared if you plan to adopt a similar method.
**First published in 2016.
Unfamiliar with any terms in this article? Browse our glossary of pottery terms!
Related Content
Ceramic Artists
Functional Pottery
Ceramic Sculpture
Glaze Chemistry
High Fire Glaze Recipes
Mid-Range Glaze Recipes
Low Fire Glaze Recipes
Ceramic Colorants
Ceramic Glazes and Underglazes
Ceramic Raw Materials
Pottery Clay
Ceramic Decorating Tools
Ceramic Kilns
Making Clay Tools
Wheel Throwing Tools
Electric Kiln Firing
Gas Kiln Firing
Raku Firing
Salt Firing and Soda Firing
Wood Kiln Firing
Ceramic Decorating Techniques
Ceramic Glazing Techniques
Handbuilding Techniques
Making Ceramic Molds
Making Ceramic Tile
Wheel Throwing Techniques