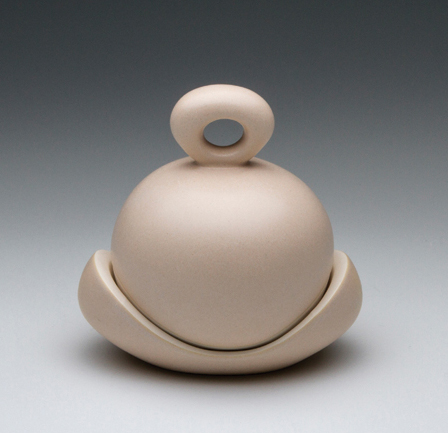
Bonbon jar, slip-cast porcelain, fired to cone 6, 2015. Photo: Louise O’Rourke.
My technical process revolves around challenging my plaster modeling and mold-making skills to capitalize on the advantages of slip casting. I began college as a wheel thrower and only became infatuated with plaster when I took Heather Mae Erickson’s Systems class at Alfred University. Erickson, then the Turner Teaching Fellow, instilled in me a striving for ingenuity and perfection in casting.
Starting with a Paper Template
The mold-making process is an ideal way to make lids; pouring plaster against plaster makes two pieces that will fit perfectly together and slip-casting allows the possibility to make a hollow, lightweight form. One of my professors at Alfred, John Gill, suggested I use paper cutouts as a means of sketching a multiple-part form. I started working this way by folding the paper in half and cutting along the folded edge to create a bilaterally symmetrical profile. After using this technique to make a butter dish in which the lid only fit one way, I wanted to make a form with a circular lid and flange system that would allow the lid to fit on the base without having to be aligned in a specific way. The design I came up with is well suited as a bonbon jar.
Carving the Plaster Model
First, I threw the base flange system in clay to utilize the concentricity of the wheel. Following my cut-out template, I made the outer groove that would also make the lip of the lid, the round elevated center, and set the diameter of the edge of the clay patty to match the widest dimension of the lid design (1). This serves as a base for a plaster model that’s added directly on top.
I use a regular potter’s wheel for this process, though it is more convenient to have a dedicated plaster wheel. Since my wheel has to be multipurpose, when using plaster, I work on a plastic bat and make sure to clean up very well. Once the clay base is ready, I set up metal flashing around it (2), then mix and pour plaster over the thrown flange system. I mix my plaster with cool water so it will set more slowly, and use my hand to agitate it slowly. As soon as the plaster sets up enough that I can remove the flashing (when it’s about the consistency of cream cheese), I rough out the general shape of the lid.
1 Throw the clay lid-flange system and diameter guide for the plaster lid model. 2 Set up and secure metal flashing around the flange in preparation for pouring plaster. After pouring, remove the flashing and start shaping the form when it reaches cream-cheese consistency. 3 After casting the knob cylinder on top of the lid, the final form is carved and sanded. Shown here with an example of the finished clay lid on the left. 4 The number of sections in each of the three molds depends on undercuts and whether the form will be single or double walled.
5 The partially assembled three-part lid mold shows the curved-in edge of the rim in the collar section. 6 The double-walled base is a four-part mold including the plug (not shown) used to seal the sprue hole to make it a fully enclosed form. A freshly cast porcelain base is seen in the background. 7 The partially assembled base mold showing the negative space between the foot and top sections, as well as the lid flange. The resulting cast base is double walled. 8 A comparison of the plaster lid model (right) and a finished lid (left) shows how the flange system works to create a rounded-over, thick rim that looks like it is double walled.
When working with plaster on a wheel, you only have as much time to shape the profile as it takes for the plaster to fully harden, which for me is roughly 20 minutes. I use large loop trimming tools and metal ribs to shape the profile. Trying to shape the plaster too aggressively at first will result in chattering. It is best to start gradually and rough out the shape. I focus on making the outer edge of the lid meet the outer ring of the flange so the lid is one continuous form. When the plaster hardens, I use water to sand with drywall mesh and wet-dry sandpaper to refine the shape and surface (see 3).
The plaster lid model will peel off of the clay base model, leaving a positive reflection of the negative flange groove (see 8). I clean up the lid model to be as perfect as possible, as it is the middle piece onto which the base and handle will be cast. Whenever I cast plaster against plaster I use Murphy’s Oil soap as a release agent. Next, I flip the lid upside down and build a wall of clay around the bottom that’s large enough to accommodate my design for the final shape for the base, and pour plaster for the base model. It is important to remember that the highest points of the base model cannot reach past the mid point of the curve of the lid, otherwise it creates an undercut and it would be impossible to pull the lid from the base. The two plaster pieces would be stuck together, such as how a ball joint functions by encasing a sphere.
Once cast, the base can be carved to the final form. To carve a solid plaster form, I fully saturate it first by soaking it in water. The plaster is fully saturated when air bubbles stop rising off the plaster in the water. This soaking eliminates plaster dust when working and allows less resistance when wet sanding. The base piece of plaster can be carved and shaped into any form as long as the integrity of the lid system remains (see the finalized slip-cast base form removed from the mold in the background in image 6).
The handle model is formed the same way as the base; a clay cylinder is affixed to the top of the lid dome and filled with plaster. This ensures the bottom of the handle model has the same curve as the domed lid so that it attaches seamlessly to the lid when cast. The resulting plaster cylinder is saturated in water then carved using rasps to make the general shape, a fettling knife is used to drill and carve the center hole. Finishing with drywall mesh and wet-dry sandpaper smooths the form into a puffy loop handle (3).
9 Cut away the excess clay in the sprue to make room for adding the plug to cast the last section to enclose the forms for the base and handle. 10 After pouring slip into the mold, insert the plug and flip it over so that it is resting on the plug. The slip will form a shell over this area, enclosing the form. 11 After casting the sprue section, but before demolding the hollow forms, poke a small hole in the forms to allow air to escape. This prevents cracking as the form shrinks. 12 Remove the bottom two sections of the base mold, revealing the foot. Clean up seam lines with a fettling knife and/or sponge.
Once I have all three forms refined, I make multiple-part plaster molds of each one (4). The number of mold sections is determined by the complexity of the form so that undercuts are avoided and the pieces release easily. The lid is made using a three-part mold (5), while the double-walled handle is a three-part mold that includes a plug (see 4, far right), and the double-walled base is a four-part mold, including the plug (6, 7).
I decided to make the lid a single-walled form for practical reasons of weight and interior volume. The curved-over rim of the lid mimics a double-walled form, but cut short (8). The base and knob must be double walled and hollow in order to have an interior contour different from the exterior.
Once plaster molds are made of the plaster models, like any other tool, I must practice using them. It can take a few rounds of slip casting to fully understand what steps give the best results. Slip-casting a closed hollow object requires filling the mold, draining, pouring in a small quantity of slip and then sealing the drain hole with a plaster cap or plug and inverting the mold so it rests on the plug, allowing the additional slip to seal the casting into an enclosed form. To cap the handle and base casts, the dried slip in the sprue is cut out (9) a little more slip added, the plug placed (10), and the mold flipped upside down. The sprue for the base is small, to minimize the mark left on the bottom of the finished piece (11, 12). Because my mold has only one smaller drain hole, when draining the excess slip, I use a straw to blow air into the mold while slip is coming out, to have an even exchange of volumes. Otherwise I find that the excess slip gets stuck and does not drain completely from the mold. Another technique for equalizing pressure would be to create a second vent hole in the bottom of the mold placed a few inches from the drain hole so that air can enter the form via this vent hole as the slip drains. This hole can be plugged at the same time as the drain hole using a small quantity of casting slip.
13 Remove the collar section from the lid mold, then carefully cut away the excess clay from the inner edge of the lid. 14 Take off one of the side sections to release the lid once it is leather hard. 15 Remove one side of the knob or handle mold once the clay reaches leather hard. 16 Score the areas of attachment on the lid and knob, apply a little casting slip, water, and vinegar, then attach the two parts.
For the lid, I remove the collar first and cut the excess from the inner edge of the lid (13). Prior to de-molding the two hollow casts, I make a pin hole in each to release trapped air and prevent cracking as the cast form begins to shrink. Once the casts are leather hard, I take them out of the molds (14, 15), clean up the seam lines and attach the handle and lid. I slip and score using casting slip, a little water, and vinegar (16), then center the handle, and use a clean, wet brush around the connecting seam of the handle and the lid to eliminate any extra slip. After cleanup is finished, I dry the lid and base together.
17 Marking where the lid and base touch along the sides makes it easier to determine what areas will need to be waxed.
To prep for glazing after the bisque, I place the lid on the base and use a pencil to trace a line marking the intersection of the lid and the base where I must apply wax (17). The lid and base are fired together and I use the glazing limitation as surface design for the jar. I brush clear glaze on the small circle in the middle of the base, as it is forgiving in terms of inconsistencies in application thickness. I spray the outside with my matte glaze because it tends to show any variation based on thickness, application, and temperature. If all goes according to plan, I have a jar that’s ready to serve bonbons.
the author Mimi McPartlan received her BFA from Alfred University. She assisted KleinReid in New York City, was a resident artist at Künstlerhaus Stadttöpferei Neumünster in Germany, and appeared in Ceramic Monthly’s Undergraduate Showcase. Currently, she is a resident artist at The Clay Studio in Philadelphia, Pennsylvania. See more of her work at www.mimimcpartlan.com.
We understand your email address is private. You will receive emails and newsletters from Ceramic Arts Network. We will never share your information except as outlined in our privacy policy. You can unsubscribe at any time.
Please enjoy this complimentary article for the month.
For unlimited access to Ceramics Monthly premium content, please subscribe.
We understand your email address is private. You will receive emails and newsletters from Ceramic Arts Network. We will never share your information except as outlined in our privacy policy. You can unsubscribe at any time.
Subscribe to Ceramics Monthly
 Bonbon jar, slip-cast porcelain, fired to cone 6, 2015. Photo: Louise O’Rourke.
My technical process revolves around challenging my plaster modeling and mold-making skills to capitalize on the advantages of slip casting. I began college as a wheel thrower and only became infatuated with plaster when I took Heather Mae Erickson’s Systems class at Alfred University. Erickson, then the Turner Teaching Fellow, instilled in me a striving for ingenuity and perfection in casting.Starting with a Paper Template The mold-making process is an ideal way to make lids; pouring plaster against plaster makes two pieces that will fit perfectly together and slip-casting allows the possibility to make a hollow, lightweight form. One of my professors at Alfred, John Gill, suggested I use paper cutouts as a means of sketching a multiple-part form. I started working this way by folding the paper in half and cutting along the folded edge to create a bilaterally symmetrical profile. After using this technique to make a butter dish in which the lid only fit one way, I wanted to make a form with a circular lid and flange system that would allow the lid to fit on the base without having to be aligned in a specific way. The design I came up with is well suited as a bonbon jar.
Carving the Plaster Model First, I threw the base flange system in clay to utilize the concentricity of the wheel. Following my cut-out template, I made the outer groove that would also make the lip of the lid, the round elevated center, and set the diameter of the edge of the clay patty to match the widest dimension of the lid design (1). This serves as a base for a plaster model that’s added directly on top.
I use a regular potter’s wheel for this process, though it is more convenient to have a dedicated plaster wheel. Since my wheel has to be multipurpose, when using plaster, I work on a plastic bat and make sure to clean up very well. Once the clay base is ready, I set up metal flashing around it (2), then mix and pour plaster over the thrown flange system. I mix my plaster with cool water so it will set more slowly, and use my hand to agitate it slowly. As soon as the plaster sets up enough that I can remove the flashing (when it’s about the consistency of cream cheese), I rough out the general shape of the lid.
1 Throw the clay lid-flange system and diameter guide for the plaster lid model. 2 Set up and secure metal flashing around the flange in preparation for pouring plaster. After pouring, remove the flashing and start shaping the form when it reaches cream-cheese consistency. 3 After casting the knob cylinder on top of the lid, the final form is carved and sanded. Shown here with an example of the finished clay lid on the left. 4 The number of sections in each of the three molds depends on undercuts and whether the form will be single or double walled.
5 The partially assembled three-part lid mold shows the curved-in edge of the rim in the collar section. 6 The double-walled base is a four-part mold including the plug (not shown) used to seal the sprue hole to make it a fully enclosed form. A freshly cast porcelain base is seen in the background. 7 The partially assembled base mold showing the negative space between the foot and top sections, as well as the lid flange. The resulting cast base is double walled. 8 A comparison of the plaster lid model (right) and a finished lid (left) shows how the flange system works to create a rounded-over, thick rim that looks like it is double walled.
When working with plaster on a wheel, you only have as much time to shape the profile as it takes for the plaster to fully harden, which for me is roughly 20 minutes. I use large loop trimming tools and metal ribs to shape the profile. Trying to shape the plaster too aggressively at first will result in chattering. It is best to start gradually and rough out the shape. I focus on making the outer edge of the lid meet the outer ring of the flange so the lid is one continuous form. When the plaster hardens, I use water to sand with drywall mesh and wet-dry sandpaper to refine the shape and surface (see 3).The plaster lid model will peel off of the clay base model, leaving a positive reflection of the negative flange groove (see 8). I clean up the lid model to be as perfect as possible, as it is the middle piece onto which the base and handle will be cast. Whenever I cast plaster against plaster I use Murphy’s Oil soap as a release agent. Next, I flip the lid upside down and build a wall of clay around the bottom that’s large enough to accommodate my design for the final shape for the base, and pour plaster for the base model. It is important to remember that the highest points of the base model cannot reach past the mid point of the curve of the lid, otherwise it creates an undercut and it would be impossible to pull the lid from the base. The two plaster pieces would be stuck together, such as how a ball joint functions by encasing a sphere.
Once cast, the base can be carved to the final form. To carve a solid plaster form, I fully saturate it first by soaking it in water. The plaster is fully saturated when air bubbles stop rising off the plaster in the water. This soaking eliminates plaster dust when working and allows less resistance when wet sanding. The base piece of plaster can be carved and shaped into any form as long as the integrity of the lid system remains (see the finalized slip-cast base form removed from the mold in the background in image 6).
The handle model is formed the same way as the base; a clay cylinder is affixed to the top of the lid dome and filled with plaster. This ensures the bottom of the handle model has the same curve as the domed lid so that it attaches seamlessly to the lid when cast. The resulting plaster cylinder is saturated in water then carved using rasps to make the general shape, a fettling knife is used to drill and carve the center hole. Finishing with drywall mesh and wet-dry sandpaper smooths the form into a puffy loop handle (3).
9 Cut away the excess clay in the sprue to make room for adding the plug to cast the last section to enclose the forms for the base and handle. 10 After pouring slip into the mold, insert the plug and flip it over so that it is resting on the plug. The slip will form a shell over this area, enclosing the form. 11 After casting the sprue section, but before demolding the hollow forms, poke a small hole in the forms to allow air to escape. This prevents cracking as the form shrinks. 12 Remove the bottom two sections of the base mold, revealing the foot. Clean up seam lines with a fettling knife and/or sponge.
Once I have all three forms refined, I make multiple-part plaster molds of each one (4). The number of mold sections is determined by the complexity of the form so that undercuts are avoided and the pieces release easily. The lid is made using a three-part mold (5), while the double-walled handle is a three-part mold that includes a plug (see 4, far right), and the double-walled base is a four-part mold, including the plug (6, 7).I decided to make the lid a single-walled form for practical reasons of weight and interior volume. The curved-over rim of the lid mimics a double-walled form, but cut short (8). The base and knob must be double walled and hollow in order to have an interior contour different from the exterior.
Once plaster molds are made of the plaster models, like any other tool, I must practice using them. It can take a few rounds of slip casting to fully understand what steps give the best results. Slip-casting a closed hollow object requires filling the mold, draining, pouring in a small quantity of slip and then sealing the drain hole with a plaster cap or plug and inverting the mold so it rests on the plug, allowing the additional slip to seal the casting into an enclosed form. To cap the handle and base casts, the dried slip in the sprue is cut out (9) a little more slip added, the plug placed (10), and the mold flipped upside down. The sprue for the base is small, to minimize the mark left on the bottom of the finished piece (11, 12). Because my mold has only one smaller drain hole, when draining the excess slip, I use a straw to blow air into the mold while slip is coming out, to have an even exchange of volumes. Otherwise I find that the excess slip gets stuck and does not drain completely from the mold. Another technique for equalizing pressure would be to create a second vent hole in the bottom of the mold placed a few inches from the drain hole so that air can enter the form via this vent hole as the slip drains. This hole can be plugged at the same time as the drain hole using a small quantity of casting slip.
13 Remove the collar section from the lid mold, then carefully cut away the excess clay from the inner edge of the lid. 14 Take off one of the side sections to release the lid once it is leather hard. 15 Remove one side of the knob or handle mold once the clay reaches leather hard. 16 Score the areas of attachment on the lid and knob, apply a little casting slip, water, and vinegar, then attach the two parts.
For the lid, I remove the collar first and cut the excess from the inner edge of the lid (13). Prior to de-molding the two hollow casts, I make a pin hole in each to release trapped air and prevent cracking as the cast form begins to shrink. Once the casts are leather hard, I take them out of the molds (14, 15), clean up the seam lines and attach the handle and lid. I slip and score using casting slip, a little water, and vinegar (16), then center the handle, and use a clean, wet brush around the connecting seam of the handle and the lid to eliminate any extra slip. After cleanup is finished, I dry the lid and base together.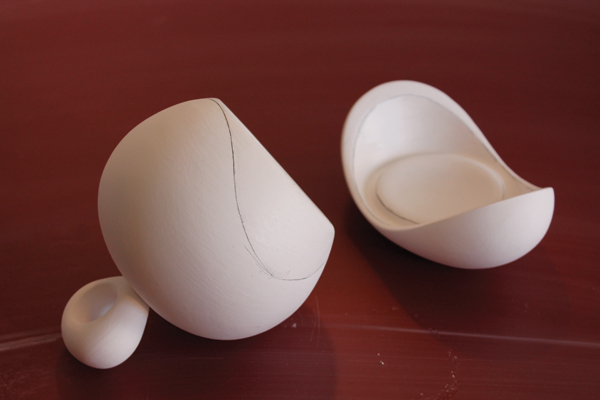 17 Marking where the lid and base touch along the sides makes it easier to determine what areas will need to be waxed.
To prep for glazing after the bisque, I place the lid on the base and use a pencil to trace a line marking the intersection of the lid and the base where I must apply wax (17). The lid and base are fired together and I use the glazing limitation as surface design for the jar. I brush clear glaze on the small circle in the middle of the base, as it is forgiving in terms of inconsistencies in application thickness. I spray the outside with my matte glaze because it tends to show any variation based on thickness, application, and temperature. If all goes according to plan, I have a jar that’s ready to serve bonbons.the author Mimi McPartlan received her BFA from Alfred University. She assisted KleinReid in New York City, was a resident artist at Künstlerhaus Stadttöpferei Neumünster in Germany, and appeared in Ceramic Monthly’s Undergraduate Showcase. Currently, she is a resident artist at The Clay Studio in Philadelphia, Pennsylvania. See more of her work at www.mimimcpartlan.com.
Unfamiliar with any terms in this article? Browse our glossary of pottery terms!
Click the cover image to return to the Table of Contents