Original art is never created in the safe middle ground but always on the edge, as Anton Bosch is doing outside the small town of White River in the Eastern regions of South Africa. He majored in painting and drawing at Pretoria Art School in the early
80s before he joined his late father, celebrated ceramic artist Esias Bosch at his studio outside town. While there, he developed a unique inlay fusion technique, which he mastered over many years to the stage where it is now. Ten years ago he moved
to his own studio and further refined the process to create his tile work.
What Are We Talking About?
We are talking about huge ceramic wall tiles (1), made by a single artist in the middle of nowhere under the big African skies where work is often interrupted by majestic thunderstorms, which can often play havoc with the process. Bosch
builds, decorates, and fires a large wall tile over a period of 4–5 weeks. Each tile is approximately 4ft. 7ft., about inch thick, and weighs about 132 pounds. It is not only the scale, but also the breathtaking detail and a depth of field that
is seldom seen in ceramics that make these tiles exceptional.
Building and Firing the Tile
Bosch starts by making a paper-clay mixture in a blunger. The paper prevents it from cracking when forced dried. The thick slip is poured into a wooden frame mold covered with calico cloth for more controlled shrinkage. The frame mold is placed directly
inside a specially designed electric flatbed kiln before the slip is poured. This way the tile does not have to be moved from a work surface to the kiln for firing. He and his father designed and built the kilns because there was nothing like it commercially
available. Electric fans are used to force dry the tile over two days. By force drying the clay, Bosch is able to speed up the process as air drying would take weeks. The wooden mold is then removed and the tile is fired for 12 hours to 1742°F
(950°C) with a 2-hour soak at the end. At this stage the tile is very strong, but still slightly porous.
Decorating the Tile
Once it is cooled, the tile is lifted out of the kiln and placed on a large decorating easel. A composition is drawn roughly with a graphite pencil while the easel is upright (2). Then the easel is turned horizontally and three layers
of white slip are painted onto the surface. The actual decorating starts with the adding of various color slips (3). Bosch applies liquid latex resist to block out selected areas, then uses a utility knife to draw the design through the surface (4).
When talking about his process, Bosch explains, “Respect your materials, minerals, and where they come from. If you don’t, you will never reach this refinement. And then, have an abundance of patience.” Cardboard templates of various
shapes are placed on the tile to work out the composition and the overall balance. These will eventually become the porcelain shapes (made from a separate fusion clay body), used as ceramic inlay. Latex resist is applied around the perimeter of the
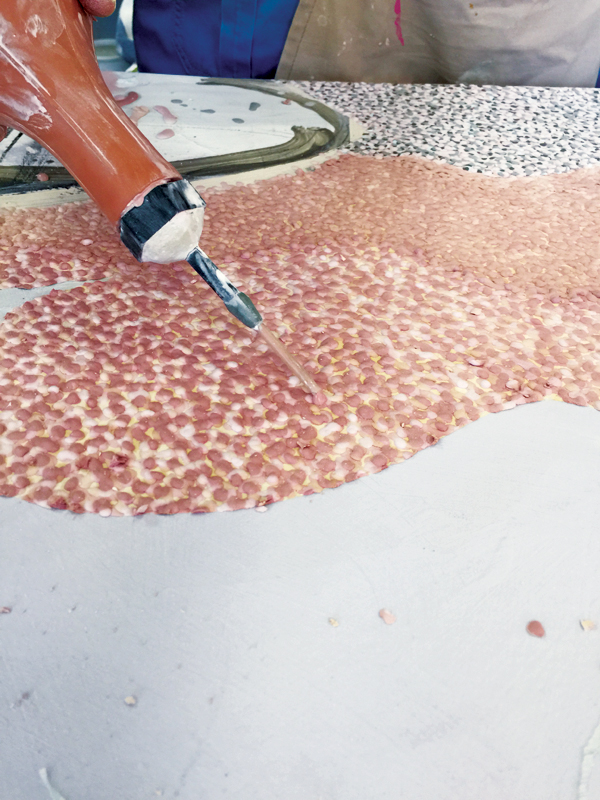
template. In the area enclosed by the latex perimeter, a cobalt pigment slip is painted on. Next, some areas are blocked out with latex, and super white slip is added onto the unblocked areas (5, 6). Work then begins on the right-hand side of the
tile. Bosch brushes a dark blue slip over the white slip, blocks out a tree design with latex resist, and paints on a light gray slip through a stencil to shape the tree (7–10).
After masking off areas in the foreground, Bosch defines the outline of a pond using a golden brown slip, that is then layered over with bold brush strokes and dots of a different color placed in multiple layers to create a Pointillism effect (11, 12).
Two figure-shaped stencils made from watercolor paper are added to the pond and an off-white slip is dabbed on with a sponge to highlight the shapes and create a layered and slightly raised surface (13, 14).
Sgraffito Wax Inlay Technique
Next, the whole tile is covered with hot liquid wax (try paraffin or beeswax) (15). Bosch incises a drawing through the surface to the bottom slip layers using a needle tool (16), rubs another super white slip into the scratched lines (17)—white
slip was used for this tile but any color can be used depending on the design—then cleans off the excess with a sponge (18), creating a sgraffito effect. The pond area, the tree, and the cobalt area are treated in the same wax sgraffito method.
Creating Fusion Clay Pieces
With the help of several people, the tile is placed in the kiln (19, 20). Before the second firing the fusion pieces must be prepared. “These fusion pieces are so important in the success of the design as with just a line, movement can be created,
the eye drawn to a color, or some object made to come alive,” says Bosch. On a separate piece of plywood covered with cloth, yellow stars (21), tan flowers and leaves, a vase shape, and a red sun are cut out of fusion porcelain clay. Long twigs
are also rolled out with black and white fusion clay. The wet fusion pieces are placed on the tile in the kiln to check placement, size, and to develop the composition. Then they are taken off the tile, randomly placed on a reuseable bisque tile,
and bisque fired so they can be handled more easily.
Firing
The lid of the large kiln is closed again and the tile is fired to 1796°F (980°C ) for 14 hours a second time. The kiln takes two days to fully cool and the tile is removed when it is 302°F (150°C). The wax residue is cleaned off with
a brush. Once the tile is clean, more color is added with ceramic cobalt crayons around the sun and rubbed with the finger to soften the lines. This will become a pale blue under the glaze. The surface is dusted with a dry transparent glaze and rubbed
into the scratched areas as well as the raised areas. Bisque-fired twigs are selected and the laying of the ceramic fusion pieces starts (22). An outline is drawn with a pencil, the bisque-fired fusion ceramic vase is placed on top of the twigs (23),
then the remaining fusion-clay stars, leaves, and flowers are placed around the tree (24, 25). When the vase arrangement is completed, the stars are placed, and various other inlays are added and selectively stacked in different layers. The tile is
then placed back in the kiln, and fired for a third time to 2102°F (1150 °C) over 18 hours, after which it cools down for three days. The tile is removed and more fusion pieces and color are added if necessary before the surface is dusted
with a transparent glaze (26). Bosch dusts the glaze on rather than brushing or spraying it because he feels he has more control over it this way. Then it is back to the kiln where the tile is fired for 20 hours to 2138°F (1170°C). Now all
the fusion pieces are absorbed and melted into the surface and all the colors are vividly exposed. Anton Bosch’s work has been exhibited extensively in South Africa and is featured in various national and international collections as well as
in the Keramion Museum in Hanover, Germany.
Recipes
the author Willem Pretorius is a writer, former editor, and a collector of ceramics living in South Africa.
We understand your email address is private. You will receive emails and newsletters from Ceramic Arts Network. We will never share your information except as outlined in our privacy policy. You can unsubscribe at any time.
Please enjoy this complimentary article for the month.
For unlimited access to Ceramics Monthly premium content, please subscribe.
We understand your email address is private. You will receive emails and newsletters from Ceramic Arts Network. We will never share your information except as outlined in our privacy policy. You can unsubscribe at any time.
Subscribe to Ceramics Monthly
Original art is never created in the safe middle ground but always on the edge, as Anton Bosch is doing outside the small town of White River in the Eastern regions of South Africa. He majored in painting and drawing at Pretoria Art School in the early 80s before he joined his late father, celebrated ceramic artist Esias Bosch at his studio outside town. While there, he developed a unique inlay fusion technique, which he mastered over many years to the stage where it is now. Ten years ago he moved to his own studio and further refined the process to create his tile work.
What Are We Talking About?
We are talking about huge ceramic wall tiles (1), made by a single artist in the middle of nowhere under the big African skies where work is often interrupted by majestic thunderstorms, which can often play havoc with the process. Bosch builds, decorates, and fires a large wall tile over a period of 4–5 weeks. Each tile is approximately 4ft. 7ft., about inch thick, and weighs about 132 pounds. It is not only the scale, but also the breathtaking detail and a depth of field that is seldom seen in ceramics that make these tiles exceptional.
Building and Firing the Tile
Bosch starts by making a paper-clay mixture in a blunger. The paper prevents it from cracking when forced dried. The thick slip is poured into a wooden frame mold covered with calico cloth for more controlled shrinkage. The frame mold is placed directly inside a specially designed electric flatbed kiln before the slip is poured. This way the tile does not have to be moved from a work surface to the kiln for firing. He and his father designed and built the kilns because there was nothing like it commercially available. Electric fans are used to force dry the tile over two days. By force drying the clay, Bosch is able to speed up the process as air drying would take weeks. The wooden mold is then removed and the tile is fired for 12 hours to 1742°F (950°C) with a 2-hour soak at the end. At this stage the tile is very strong, but still slightly porous.
Decorating the Tile
Once it is cooled, the tile is lifted out of the kiln and placed on a large decorating easel. A composition is drawn roughly with a graphite pencil while the easel is upright (2). Then the easel is turned horizontally and three layers of white slip are painted onto the surface. The actual decorating starts with the adding of various color slips (3). Bosch applies liquid latex resist to block out selected areas, then uses a utility knife to draw the design through the surface (4). When talking about his process, Bosch explains, “Respect your materials, minerals, and where they come from. If you don’t, you will never reach this refinement. And then, have an abundance of patience.” Cardboard templates of various shapes are placed on the tile to work out the composition and the overall balance. These will eventually become the porcelain shapes (made from a separate fusion clay body), used as ceramic inlay. Latex resist is applied around the perimeter of the template. In the area enclosed by the latex perimeter, a cobalt pigment slip is painted on. Next, some areas are blocked out with latex, and super white slip is added onto the unblocked areas (5, 6). Work then begins on the right-hand side of the tile. Bosch brushes a dark blue slip over the white slip, blocks out a tree design with latex resist, and paints on a light gray slip through a stencil to shape the tree (7–10).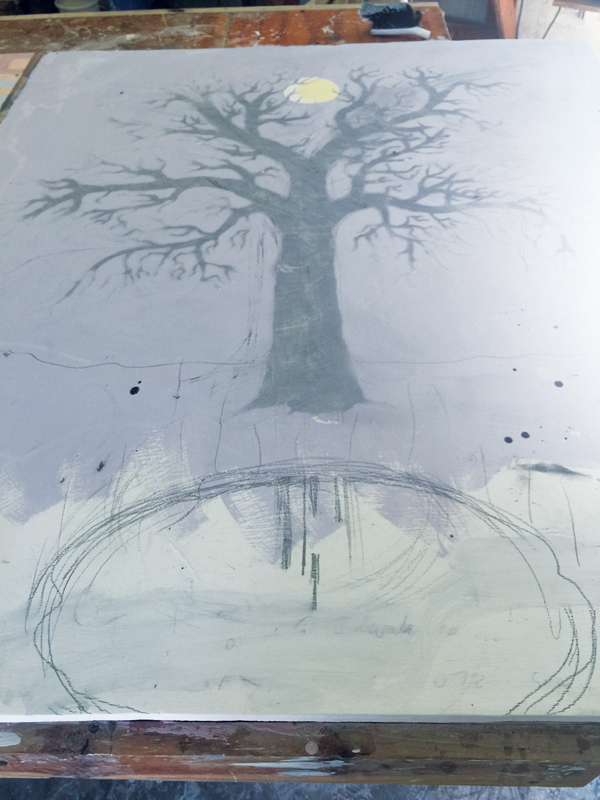
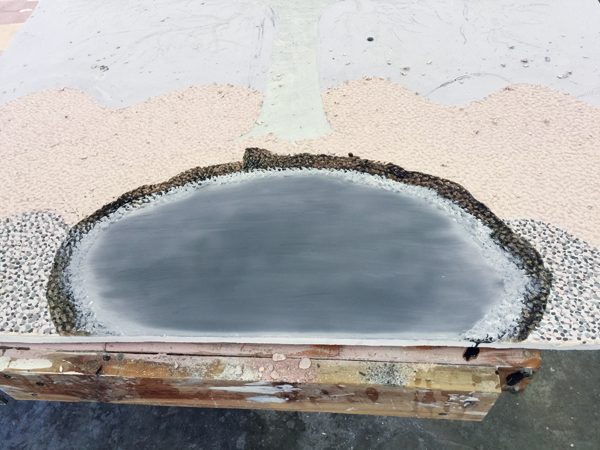

After masking off areas in the foreground, Bosch defines the outline of a pond using a golden brown slip, that is then layered over with bold brush strokes and dots of a different color placed in multiple layers to create a Pointillism effect (11, 12). Two figure-shaped stencils made from watercolor paper are added to the pond and an off-white slip is dabbed on with a sponge to highlight the shapes and create a layered and slightly raised surface (13, 14).
Sgraffito Wax Inlay Technique
Next, the whole tile is covered with hot liquid wax (try paraffin or beeswax) (15). Bosch incises a drawing through the surface to the bottom slip layers using a needle tool (16), rubs another super white slip into the scratched lines (17)—white slip was used for this tile but any color can be used depending on the design—then cleans off the excess with a sponge (18), creating a sgraffito effect. The pond area, the tree, and the cobalt area are treated in the same wax sgraffito method.
Creating Fusion Clay Pieces
With the help of several people, the tile is placed in the kiln (19, 20). Before the second firing the fusion pieces must be prepared. “These fusion pieces are so important in the success of the design as with just a line, movement can be created, the eye drawn to a color, or some object made to come alive,” says Bosch. On a separate piece of plywood covered with cloth, yellow stars (21), tan flowers and leaves, a vase shape, and a red sun are cut out of fusion porcelain clay. Long twigs are also rolled out with black and white fusion clay. The wet fusion pieces are placed on the tile in the kiln to check placement, size, and to develop the composition. Then they are taken off the tile, randomly placed on a reuseable bisque tile, and bisque fired so they can be handled more easily.
Firing
The lid of the large kiln is closed again and the tile is fired to 1796°F (980°C ) for 14 hours a second time. The kiln takes two days to fully cool and the tile is removed when it is 302°F (150°C). The wax residue is cleaned off with a brush. Once the tile is clean, more color is added with ceramic cobalt crayons around the sun and rubbed with the finger to soften the lines. This will become a pale blue under the glaze. The surface is dusted with a dry transparent glaze and rubbed into the scratched areas as well as the raised areas. Bisque-fired twigs are selected and the laying of the ceramic fusion pieces starts (22). An outline is drawn with a pencil, the bisque-fired fusion ceramic vase is placed on top of the twigs (23), then the remaining fusion-clay stars, leaves, and flowers are placed around the tree (24, 25). When the vase arrangement is completed, the stars are placed, and various other inlays are added and selectively stacked in different layers. The tile is then placed back in the kiln, and fired for a third time to 2102°F (1150 °C) over 18 hours, after which it cools down for three days. The tile is removed and more fusion pieces and color are added if necessary before the surface is dusted with a transparent glaze (26). Bosch dusts the glaze on rather than brushing or spraying it because he feels he has more control over it this way. Then it is back to the kiln where the tile is fired for 20 hours to 2138°F (1170°C). Now all the fusion pieces are absorbed and melted into the surface and all the colors are vividly exposed. Anton Bosch’s work has been exhibited extensively in South Africa and is featured in various national and international collections as well as in the Keramion Museum in Hanover, Germany.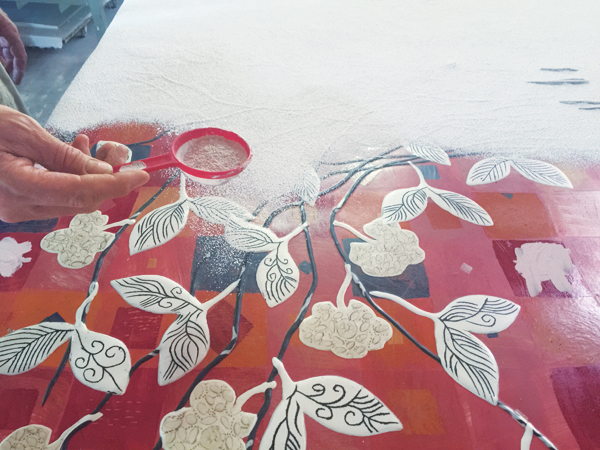
Recipes
Unfamiliar with any terms in this article? Browse our glossary of pottery terms!
Click the cover image to return to the Table of Contents